Timebolt.io Review: Automatically Remove Silences from Your Video and Audio
Get the Gist…
- Editing video and audio can be incredibly time-consuming, especially when tasks like adding jump cuts, removing silences, adding transitions, and enhancing audio are all done manually.
- These operations are required of almost ALL video edits, and usually require specific software and knowledge to do.
- With Timebolt.io, you can do all these time-draining tasks within minutes, without a lot of technical experience, potentially saving you HOURS on your video editing process.
Can we all just agree that video editing takes too long? With the recent boom in technology and tools, time-intensive editing might be a thing of the past. In this in-depth Timebolt.io review, we’ll dive into the features and benefits of this revolutionary video editing software that could potentially save you HOURS per video.
What is Timebolt?
Timebolt is a cutting-edge video editor for Windows and Mac that automates time-consuming tasks like adding jumps cuts and removing silence your video or audio files. With its powerful set of tools and user-friendly interface, Timebolt simplifies the video editing process for vloggers, podcasters, gamers, educators, and professionals alike.
For videos that I’ve created in the past, I typically spend A LOT of time ridding my videos of silent deadspace in order to create a smooth flow and transition throughout my video. Depending on the length of the video, this can take a lot of time and effort. Usually this results in spending so much prep time on the videos before actually getting to the creative aspect of it.
With Timebolt, I spend less time on the non-creative aspects of editing, so I can enjoy working on the creative parts of my content.
Who is Timebolt for?
Timebolt is designed for a wide range of users who want to optimize their video editing workflow, including:
- Vloggers and podcasters who need to produce high-quality videos for platforms like YouTube, Instagram, and Facebook.
- Content creators looking to speed up their short-form video editing processes
- Gamers who want to create engaging gameplay videos and walkthroughs with minimal effort.
- Educators and trainers who produce instructional videos and tutorials for their students or clients.
- Business professionals and employees who need to edit videos for presentations, marketing, and communication purposes.
- Independent video editors and production companies looking to speed up their editing process and improve efficiency.
What are the key features of Timebolt.io?
Timebolt.io offers an impressive array of features that cater to the needs of both novice and experienced video editors looking to free up more of their time.
Let’s explore the different ways Timebolt.io can save you more time.
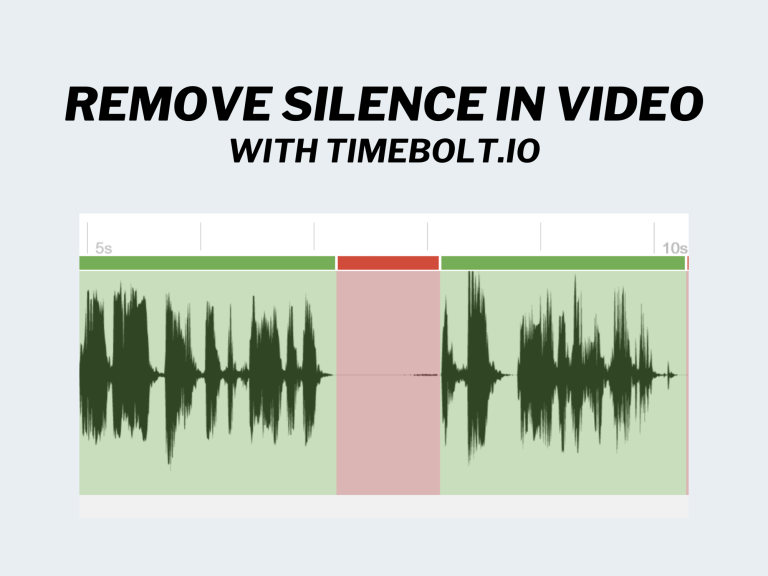
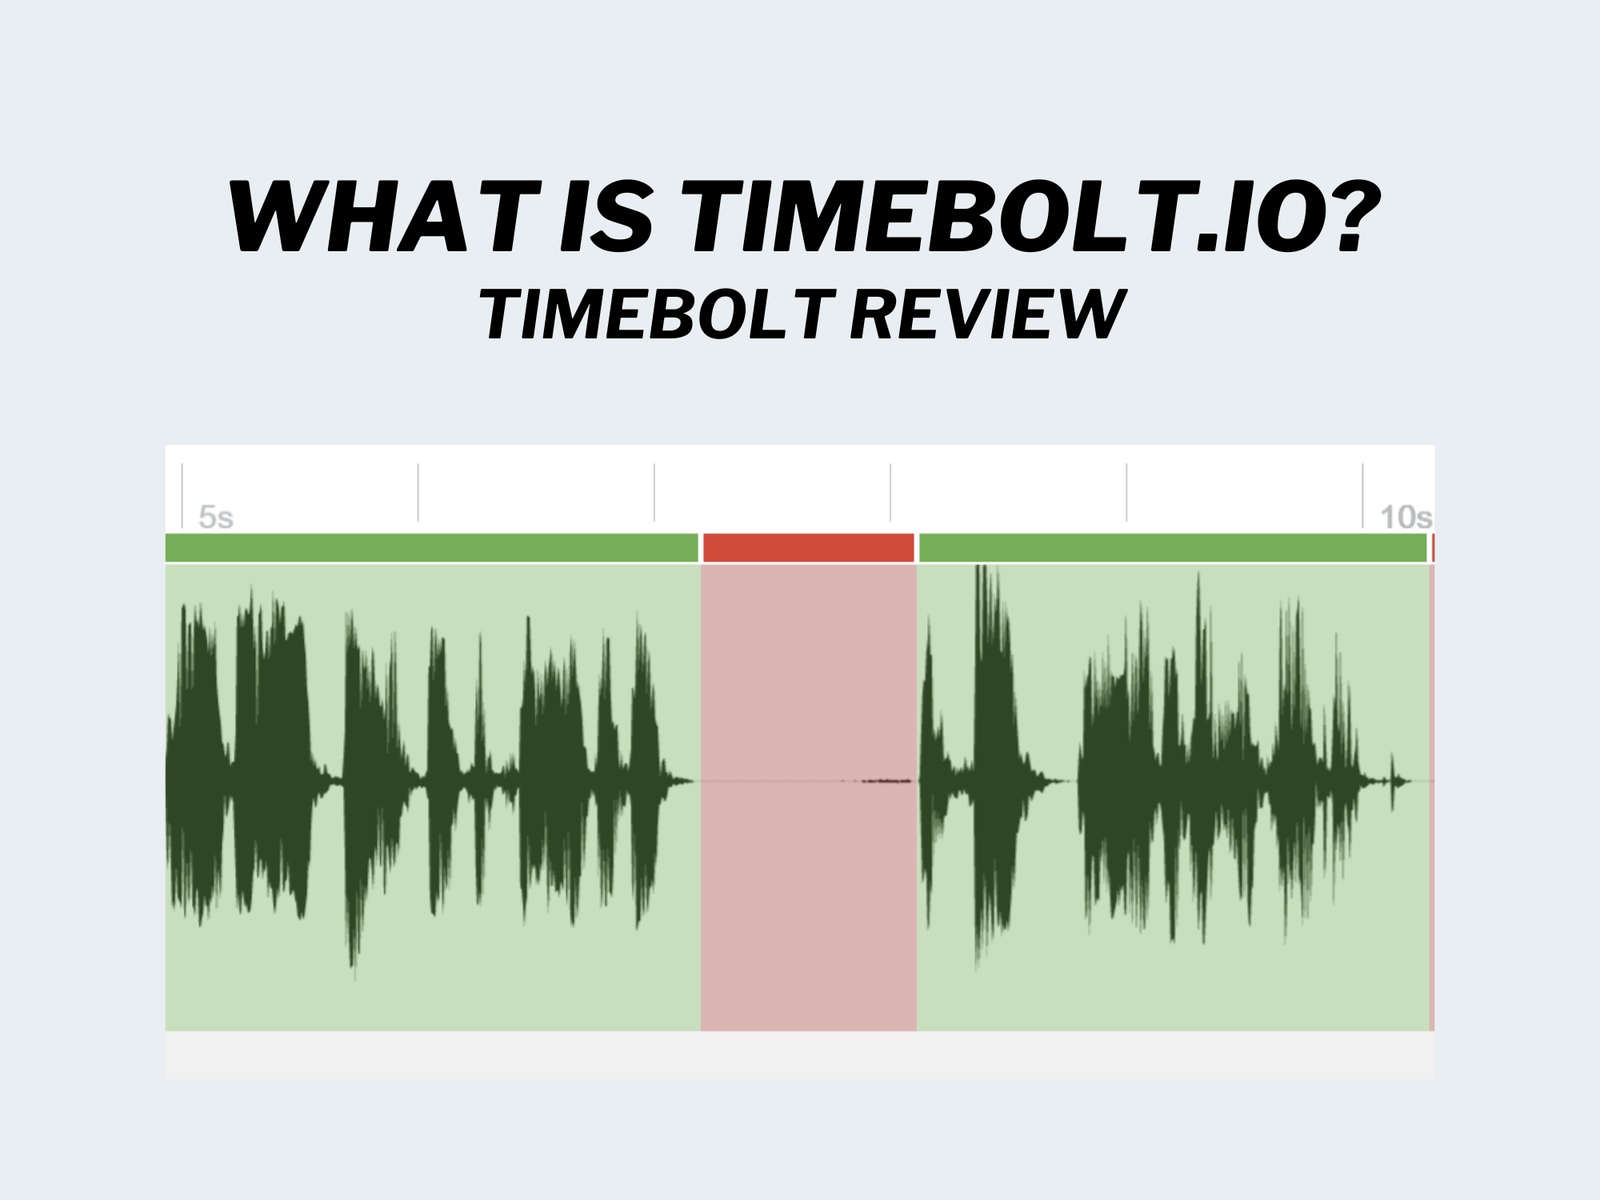
1. Automatic Silence Detection and Removal
One of the biggest timesavers in Timebolt.io is it’s ability to detect and remove silences from your audio. Something that could pull away from your valuable time, can now be done in an instant with this silence detection tool. Here’s how it works:

When you first boot up Timebolt, you’ll be greeted with a simple design to get you started. There’s really not much to getting started other than selecting the file from your computer that you want to remove silences from.
Once the video is uploaded, Timebolt.io already started working it’s magic and identifying where it feels the silences are located.

Anywhere that Timebolt detects silence will be highlighted in red. The default parameters to detect silence are:
- Sound below -45dB
- Silences longer than 0.5 seconds
- Detected sound shorter than 0.75 seconds
Additionally, Timebolt adds padding to either side of the silence to make for a more natural cut within the video:
- Left Padding: 0.09 seconds
- Right Padding: 0.15 seconds

If you’re unhappy with the way Timebolt detects silence by default, these setting can be adjusted manually to suit your personal preference. Simply adjust the settings to your liking and click UPDATE SILENCE DETECTION. Timebolt will reanalyze and detect silences in your video based on the preferences you input.
From my experience with the silence detection, these default settings do a solid job on their own, but I do have to adjust them occasionally depending on the video and my recording environment or equipment used. If you’re unable to achieve that perfect balance, you have the ability to do some manual touch ups as well. We’ll talk about this below in Number 3.
2. Fast Forward Silences Instead of Removing Them
Maybe you don’t want to completely remove these sections form your video. Instead, you can fast forward through them.

After you’ve properly detected the silences in your video, scroll down to Rendering Enhacement and check the box for FastForward Silences?
After checking the box, additional options will appear giving you some control over the sections that your video will fast forward through. By default Timebolt will only fast forward through silences that are longer than 90 seconds.
This is actually really helpful for tutorial videos where you’d like to show what is happening on screen, but don’t necessarily have any speaking in the video. For some use-cases and examples of this, take a look at Fast Forward Silences with Timebolt.io.
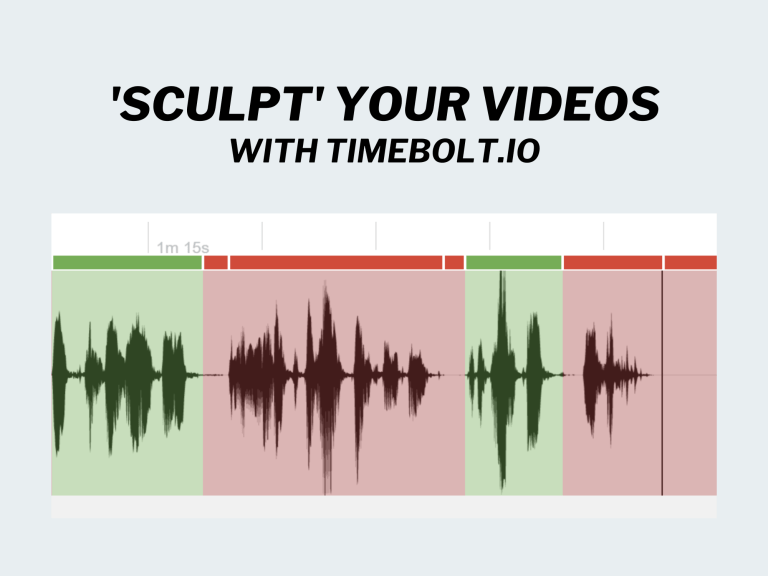
3. Sculpt Your Videos with Timebolt
Even after you’ve gone through the silence detection process, you aren’t stuck with what Timebolt decides. You have the ability to further tweak and adjust what stays and what goes in your video prior to exporting.
Head back to your video or audio timeline, and here you can pick and choose what to keep or remove from your video.

By clicking on the red bar on the top, this segment will turn green and will now be included in your exported video. Likewise, clicking the bar on a clip that is highlighted green will change to red and be removed from the exported video or audio file.
For even greater precision in choosing what stays and what goes, you can split the clips on the timeline and repeat the process above to choose what segments are kept and what segments are removed.

With the playhead positioned at the point you’d like to make a cut, click the Create Split button, or simply click ‘S’ on your keyboard. This will cut the timeline and allow you to keep or remove portions of segments. I have a more in-depth tutorial on sculpting with Timebolt.io here.
4. Quickly Apply Transitions in 1 Click
Rather than bringing your video over to another editing platform to apply transitions to your video, you can accomplish this all from within Timebolt.

Check the Apply Transitions box, and you’ll notice two new settings appear below. These settings allow you to set the:
- Type of Transition
- Transition Duration (in seconds)
From a video editing perspective, there are a few things to note while using this feature:
- A transition will be applied to every cut in the video, so if you’re video has a lot of cuts in it, the repeated transitions may be unappealing to the viewer.
- Timebolt recommends setting your Left/Right Padding (mentioned above in Automatic Silence Detection and Removal) to 0.05 seconds more than your transition duration. For example, if your Transition Duration is set to 0.15 seconds, your Left/Right Padding should be set to 0.20 seconds.
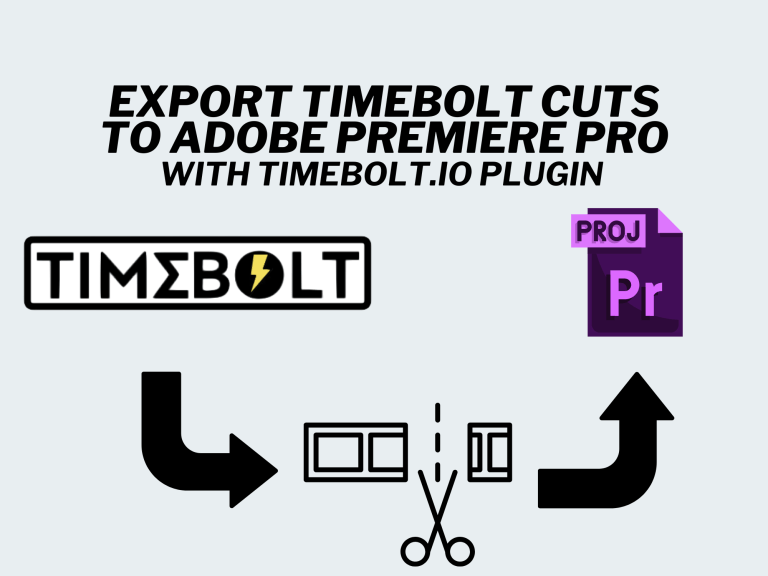
If you’d prefer to handle your transitions in another editing program, you can export your video, WITH CUTS, into Adobe Premiere Pro, Davinci Resolve, or Camtasia.
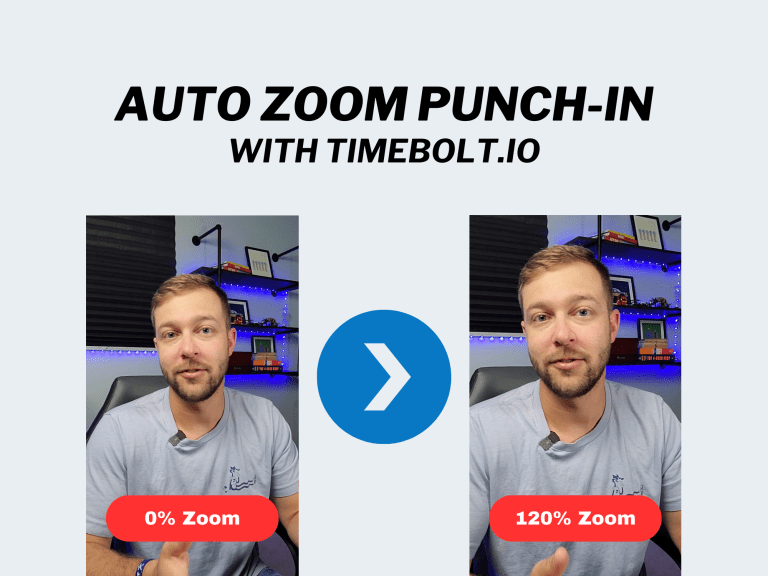
5. Adding Punch Ins into Your Videos
Adding a Zoom Punch effect into your videos, is another one of those time-sucking tasks that can drain creativity from any editing project. With Timebolt, adding these Punch Ins is as easy as pressing ‘P’ on your keyboard.
![Preview window and timeline with a clip that the Punch In feature has been added to. The timeline shows text "[center][125%]" on the clip that the Punch In was applied to.](https://ninefivetofreedom.com/wp-content/uploads/2023/04/Image-8.svg)
Move the playhead to the start of a clip, or wherever you’d like to add a jump cut and simply click ‘P’. There are four different Punch In percentages to choose from and continuing to press ‘P’ will cycle through each of them before returning back to the default 100%:
- 100% (default)
- 125%
- 150%
- 175%
Do the percentages not fit with your video recordings? Set your own punch in percentages that fit YOUR video. Check out our How to Add Punch Ins article to learn more.
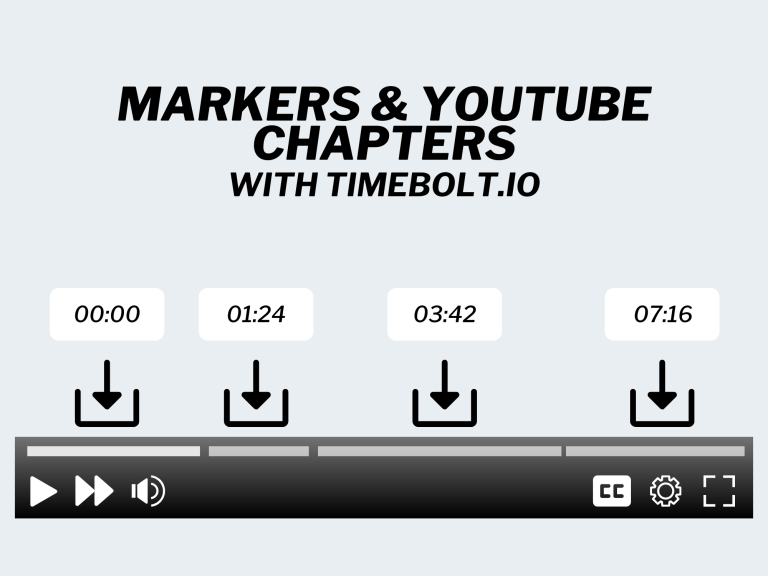
6. Use Markers to Add YouTube Chapters and Create Short-Form Video
Markers are one of my favorite features inside Timebolt. With markers, you can quickly create chapters for your YouTube videos. You can also use markers to create short-form video content like Reels, TikTok videos, and YouTube Shorts.
Here’s how easy it is:

Right-click on whichever clip you’d like to mark and choose Mark, or simply click ‘M’ on your keyboard. To create chapters for your YouTube videos, right click on your marked clip and give that marker a title.

When you’re finished adding your video chapters, scroll down and click the 3 dots and choose Download Markers Text File. This text file is automatically formatted for you to copy and paste directly into your YouTube video description.
7. Umcheck
This is a fairly new feature to Timebolt.io and one that I have not had the chance to use personally, but the process is pretty straightforward. After clicking on the UmCheck button below the timeline, you’ll be greeted with the following message:

The transcription service and UmCheck does come at an additional cost, even if you’re on one of the paid packages of Timebolt. You can find more information related to Timebolt transcriptions on their website.
I will be adding more resources and tutorials about this feature in the near future, so check back soon for the complete walkthrough!
8. Add Looping Background Music to Videos and Audio
Adding background music into your video or audio files is another straightforward process that can enhance the viewer/listener experience.
Navigate back to Rendering Enhancements to where it says Select Looping Background Music.

Select the mp3 music file that you’d like to loop in the background of your video and adjust the Background Music Volume to your liking. Keep in mind that music that is too loud or too quiet may be distracting for the viewer, so be sure to test and find a healthy balance for your music vs video volume.
Learn more about this feature, here.
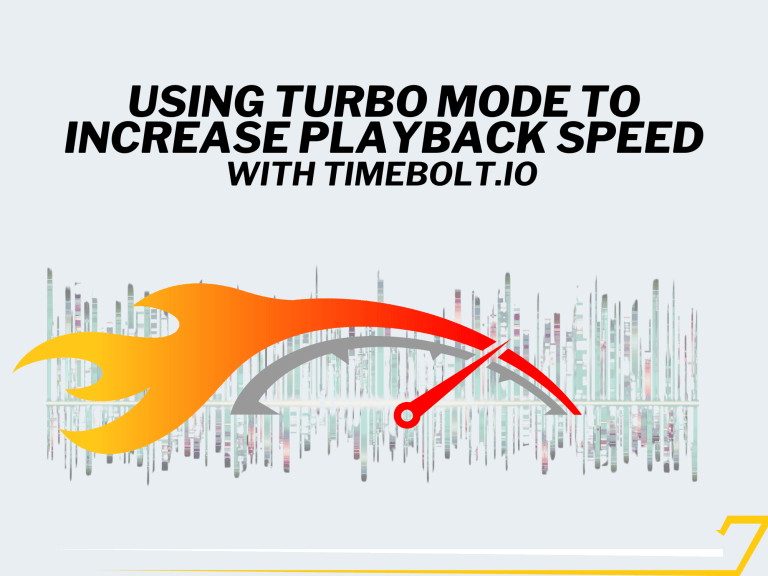
9. Speed Up Your Videos with Turbo Mode
There may be instances where you want to save on video duration or cut down on total video length. Timebolt’s Turbo Mode can help accomplish this by speeding up your videos.
To turn on Turbo Mode for your videos, head down to 3 dots and select Activate Turbo Mode.

From here you have two options:
- Choose a time limit (in seconds) that your video needs to fit within
- Apply a speed multiplier to your videos (eg. 1.125x)

Once your video is added to the Render Queue, it will exported at the rate or withing the timeframe that you specified in the dialog box.
10. Integration with Professional Video Editing Software:
If you’re an Adobe Premiere Pro, Davinci Resolve, or Camtasia user, you can easily export your video files to be used in these platforms and continue your editing and creative process. There are a few ways to bring your videos over:
- Export and upload your video as an entirely new video (without cuts)
- Export your new video (with cuts) into your editing software
- Export your video (with cuts) with no silences removed
There are several more steps involved with getting this set up, so if you’d like to learn more about exporting your videos from Timebolt.io to Adobe Premiere, click here for the walkthrough.
Pricing and Plans
Timebolt offers multiple pricing options depending on your specific need or use.
Basic Plan – Free
The basic plan for Timebolt.io is completely free, but comes with a few caveats.
- Video editing only (no audio editing)
- No saving your edits
- All videos are watermarked
- No ability for XML export
Depending on your specific needs these might not be an issue for you, but these limitations may be a deal-breaker for some.
Click here to try Timebolt.io now.
Paid Plan
With the paid version of Timebolt.io, you have a few payment options:
- $17 per month
- $97 for the year
- $247 for lifetime access
When upgrading to the paid plan you can expect:
- Ability to edit video AND audio files
- Edit and export ANY duration of video or audio
- XML and Plugin export (great if you plan to continue editing in programs like Davinci Resolve or Premiere Pro)
- Access to Umcheck
Although you do get a few free runs with it, it’s worth noting that Umcheck is a “pay per use” service and is not included in the pricing listed above. This is a rather new feature to Timebolt and have not personally used it myself. I will update this post with more information on pricing and functionality when I’ve had the chance to try it myself.
Effortlessly Add Jump Cuts and Remove Silences from Your Videos
To be honest, I’ve been using a similar tool within Adobe Audition for a while to help me remove silence from my podcast episodes, but was having difficulty finding anything that did the same for video. This really prevented me from going all in on video from the very beginning.
Timebolt.io is a groundbreaking video editing solution that can save you countless hours and transform your editing workflow. With its robust features, seamless integration, and flexible pricing options, Timebolt is an invaluable tool for anyone looking to create professional-quality videos with minimal effort.
Don’t waste another minute on tedious editing tasks – try Timebolt today and experience the future of video editing.